Although NOMI was an exclusive tool which creates a sculpted prim, NOMI 4.0 can also output Collada files which can be used as Mesh objects in Second Life.
Because the step of upload of the mesh changed from the viewer 3.1 of Second Life, I will show you the step of it. 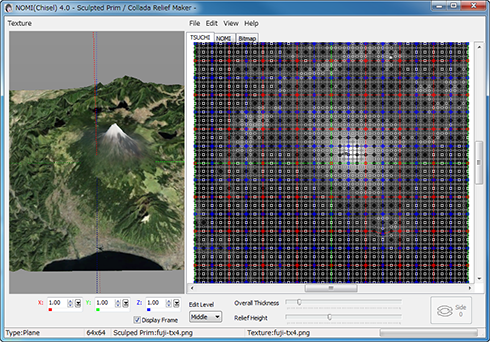
NOMI 4.0 not only can change the sculpted prim into the mesh, but can output multiple sculpted prims as one mesh object.
You can download NOMI 4.0 from http://kanae.net/secondlife/nomi.html.
NOMI 4.0 is shareware. Please purchase a serial box in a Second Life. The serial box which you purchase will provide a unique password for you to use.
*Because the spec of Second Life was changed, you cannot upload the Collada file outputted before NOMI 4.0.46. Please download the latest version.
How to make the Collada file by NOMI 4.0
Boot NOMI and select New Project on the File.

Specify the Project Type and Size on the New Project dialog.
Since NOMI 4.0 can output multiple sculpted prims, you can edit more vertexes. NOMI outputs them to the Collada file as one object.

Choose Load Base Picture on the File menu, and open the picture as the base.

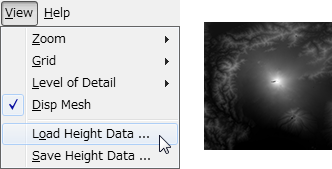
Choose Load Height Data on the View menu, and open the picture of height. A white dot is a high place. And a black dot is a low place.
You can make these images by BIL2BMP using the data downloaded fromNOAA. BIL2BMP is freeware. You can check how to use BIL2BMP fromTutorial N04 Make a Island by NOMI.
Adjust Oval Thickness and Relief Height which are arranged under the edit pane, and edit the height of relief.

Select "Save Sculpted Prim / Collada" on the File menu. 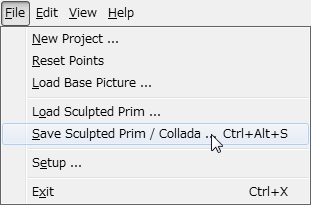
Choose Collada File by "Save as Type (kind of file)".
Since the Option dialog of Collada is displayed, choose an option and click the OK button. "-tx" is automatically added to a texture file by the file name. For example, if you set "mesh.dae" as the file name, NOMI will output "mesh-tx.png" file as the texture. 
-Save .dae and .obj File - The OBJ file with the same texture information as the Collada file is outputted simultaneously. (You can use the OBJ file bySOMATO.)
-Save low/medium/high LoD - You can save High/Medium/Low Level of Detail Collada files. As for a file name, "-high" / "- medium" / "- low" is added automatically, respectively. For example, if you set "mesh.dae" as the file name, NOMI will output "mesh-high.dae", "mesh-medium.dae", and "mesh-low.dae."
-Save .dae and .obj File – NOMI also outputs an OBJ file with the same vertics information and UV map.
-Optimize vertics Option
--Not Optimize vertics - You can save the Collada file of the completely same structure as the sculpted prim.
--Optimize vertics - Keep UVMap - You can use same texture file as sculpt map file.
--Optimize vertics - You must make another texture file by other graphic tool.

Upload your Collada file to the in-world.
Let's use the Collada file which NOMI outputted as Mesh of Secondlife. Boot your viewer and move to the parcel where you can Rez the object on the Mesh SIM.
Choose Upload - Model on the Build menu. 
Set the Collada file of High LOD which NOMI outputted.
The following Upload Model dialog is displayed.  You can set “This model represents..”. But, you can upload the mesh without seting it.
Choose “Load from File” of the drop down list of Source of Medium.
Click "Browse.." button and set the Collada file of Medium LoD. 
Choose “Load from File” of the drop down list of Source of Low. 
Click "Browse.." button and set the Collada file of Low LOD. 
Since the Collada file of Low LOD is small enough, you can set “Use LoD above” as Lowest.
Choose “Use LoD above” of the drop down list of Source of Lowest. 
Next, let's set physics shape. Click the Physics tab. 
Choose “Low” of the drop down list of "Step 1:Level of Detail".
Please do the following steps, when you want to set physics shape more.
Click the Upload options tab. 
You can do set of the scale of model in Upload options.
Choose High of the drop down list at the lower left of Preview, and check the match of physics and the form. 
If you check the Texture checkbox at the lower right of preview, you can see the texture of Collada file on the preview.
If you check Include textures, you can upload the texture together with the model. The cost is added. There is no discount. 
Click the “Caliculate weights & fee” button. The upload price to in-world and weight are calculated and displayed. 
Click the Upload button, And the Collada file will be uploaded to your inventory as the object of the name which you set as Model Name. 
Rez it from your inventory.
Choose the Features tab of Edit floater and change Physics Shape Type: into Prim from Convex Hull. 
As shown in the following figures, you can dive into 3D map.
The Mesh object was completed.
Original text: http://kanaemesh-j.blogspot.com/2011/10/mn402-nomi40mesh-viewer-31.html
This article is automatically translated by the computer interpreter.
Please notify me of any mistakes in translation.


